Showing posts with label Tim Holtz. Show all posts

Friday, 4 December 2020

Getting Merry and saying goodbye!


Hi everyone - it has been some time - I have turned into a reluctant blogger! Today sees our final challenge at A Vintage Journey.  I know, very sad - but the craft world seems to be moving away from blogging into the instant social media world! For me, I hope this changes - I find most (not all!) of social media quite toxic and find I am using it less and less. I feel it creates more harm than good - but that's just me! 

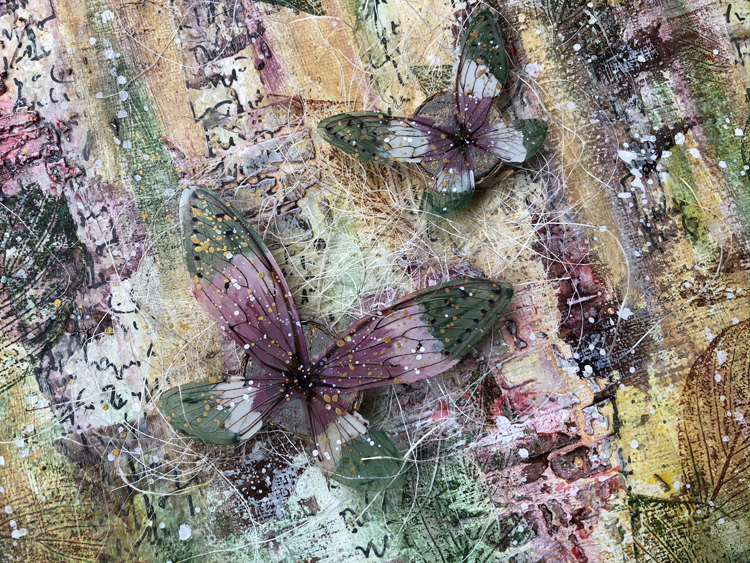
For our final challenge we have created on the theme of Merry Little Christmas - ATC's to celebrate this wonderful time of year. I created some inky backgrounds with Distress inks / oxides and added some background stamping. The stamps are a combination of Sara Naumann (PaperArtsy) and Tim Holtz.


I have combined stamping on some painty backgrounds with stamping and fussy cutting on book paper.


Can't beat a few splatters to finish off! The designs originate from a recent Tracy Evans workshop I did. Tracy was one of the original AVJ DT! 

Our final make is another ATC to say goodbye!
This time a gelli print background with a fussy cut bird from Tracy Evans (AALL and CREATE).


The words say it all - I cherish my 6.5 years with AVJ -  a wonderful experience and some fabulous friendships made! But we must focus on today - even in Covid times - and adapt as we can to what is 'in the now'.

Love and hugs to everyone at AVJ, past and present, and the wonderful followers of our blog.
Nikki
xxxx

Monday, 27 July 2020

Skype Craft - Ken's Houses


Hello! It seems like a while since I have posted on here. I have been doing some online classes during the lockdown period but either haven't got round to taking photos to share or haven't finished them!!! Still crafting just not finding the motivation to blog.

However a week or so ago I had another Skype Craft session with Alison Bomber and Brenda Brown - actually it was across 2 sessions as we chatted so much we didn't finish the first time (and we had to allow Alison's crackle to crackle!)
Brenda's lovely husband Ken has been busy and cut us all some wooden houses - so we all worked on the same substrate.


I painted my houses with Summer Sky Fresco paint and then randomly coloured on Tim Holtz printed tissue paper (on the back). Having added this to the substrate I added some book page scraps, some drips and some leftover stamped card. I also added some extra paint highlights to help with the colour composition.


I stamped a quote (an old Tim Holtz stamp set) on some painted card and found some leaf and butterfly embellishments that I painted and stamped on.

The sides - that you cant see too well are also stamped.


Pleased with these - so much so I have them in my living room - to remind me to challenge myself occasionally!

My lovely friends have both excelled themselves with their designs.....you can find all the details on their blogs.


Nikki xxx

Monday, 30 March 2020

Isolation Skype Craft 1


Hello everyone

What difficult times we are living through. I feel lucky to have a hobby to turn to where I can sometimes forget any problem or worries.

On Friday I got together (virtually of course) with two crafting friends - Brenda Brown and Alison Bomber for one of our 'Skype Craft' days - it's been a while since we have done this. What a joy to spend several hours crafting, chatting and laughing with friends.

I worked on a large canvas, Brenda on a similar sized board and Alison in her large journal. 
As we have done in the past we take it turns to select the next step. I took photos at first then got carried away and stopped!!!

1. All - Seal the substrate with a coat of gesso/tinting base.

2. Alison - Use tissue paper and/or tissue tape.

3. Nikki - Use a stencil for some texture.

4. Brenda - Add some text/number stamping in any gaps

5. Alison - Add more than one colour paint in any way you'd like to,

Here you can see my strips of tissue paper, Grunge Paste through a brickwork stencil, some stamping and some washes of colour (Paper Artsy paint) added and then dabbed to remove with kitchen towel.

6. Nikki - Use something to create a resist. 


I really wanted use my new Izink Ice Translucent Gels from Seth Apter - so scraped some over the surface and dried. I also added some candle wax in places for additional resist.

7. Brenda - Use a colour medium to reveal your resist areas.

I added lots more paint layers at this point to create more contrast and depth and also allowed some paint to drip. 

8. Alison - Add some more stamping but not text and numbers.

I used a wonderful leaf stamp - from Lin Brown - PaperArtsy. 


9. Nikki - Select a focal point and gather elements together.

Textured Canvas with PaperArtsy Fresco Paint, Seth Apter Izink Ice, Tim Holtz Transparent wings

 10. Brenda - Alter/colour up/prepare and position elements for your focal point/s.

I painted the back of the Tim Holtz Ideology transparent wings in colours to match my canvas and splattered the front with white and gold paint. 

11. Alison - highlight or refresh the original background before adhering the embellishments.

I continued to build up my layers adding some dry brushed paint and using my pallet knife to add more Izink Ice. Oh and some splattered paint of course. The brown I originally scraped for resist, the red in the bricks and the transparent yellows on the canvas is the ICE.

Textured Canvas with PaperArtsy Fresco Paint, Seth Apter Izink Ice, Tim Holtz Transparent wings


I love some of the textures I managed to create - not sure about the overall composition but love the texture !!!!
When we do these sessions it is amazing how different everyone's turns out. Here are some sneak peaks for Alison and Brenda.


Sorry for this long post! We are hoping to Skype Craft again very soon - so look out for our next adventure!

Take care, stay safe, stay home (if you can) 
Nikki xxx


Friday, 6 March 2020

Celebrating our Anniversary at A Vintage Journey

Mixed Media Birthday Card with Tim Holtz Tattered Butterfly die

Hi everyone. A Vintage Journey is celebrating it's 6th Anniversary! I know blogs and challenge blogs have lost some of their popularity but this one is very dear to me. I have made good friends, many of who I have met because of this blog. I have also been inspired by many artists both from the Design Team and those who have entered our challenges.

Brenda who created and started this blog is our host this month. We are looking for Celebration themed creations - let us know what you are celebrating!

My card is for one of those crafty friends who celebrate their birthday this month.

My background is some printed paper which I added some washes on paint to to tone it down a little. I painted and crackled some corrugated card as the base for my Tattered Butterfly.


The butterfly was cut from greyboard and texture paste added which I randomly stamped into to create texture. Once dry I painted black, dry brushed with white and then added washes on paint.

Under the butterfly are some weird extra wings. These are actually part of a wildflower die that I altered and really wanted to use but it didnt work with my layout so I improvised. 


A few crackled arrows, some fibres....


and some little squares complete my card. I hope you like it!


We hope you will join us for our celebratory challenge. 
Nikki 
xxxxx

Friday, 3 January 2020

Eileen Hull Notebook for AVJ

Eileen Hull Notebook Die
Happy New Year!

We begin 2020 with the theme 'We are all getting older'! at A Vintage Journey. Well that is true !

Time for weathering and distressing, or some ageing and antiqueing. Make a project using techniques for making the new look old, whether that's paper projects, altered art or mixed media. Just remember to ensure that you create in one of our preferred styles of vintage, shabby,mixed media, art journaling, industrial, timeworn or steampunk.

I have created a vintage notebook using Eileen Hull's notebook die. I began with the die cut book and covered in some Tim Holtz paper and added washi tape to help reinforce the spine. I started with washes of gesso to tone down the paper before stencilling, stamping and splattering to finish the cover.
I used distress paints to alter the little butterflies, corner pieces and letters.
The inside was simply done with a little paint and stamping before the signature was secured with some outer pages.
I cheated a little with my pages - using a stapler to create the signatures - which I then secured together with some calico down the spine.
Eileen Hull Notebook Die

Eileen Hull Notebook Die
Do head on over to A Vintage Journey where the lovely and talented Alison Bomber is our host for this challenge. There is lots of ideas to get you inspired if you would like to join the challenge.
Nikki


Friday, 22 November 2019

Vintage Easel Card with Tim Holtz products

Vintage style Easel Card with Tim Holtz
Three posts in a week for me! Haven't done that in a long time. Over at A Vintage Journey I am sharing a tutorial on this Vintage style Easel card today.... lots more details and photos here!
Nikki
xxx

Monday, 11 November 2019

Tim Holtz Large Stems - Thinking of You


Tim Holtz Large Stems Bigz die

Hi everyone. Today see's my second week in the Designer Spotlight at Simon Says Stamp. Our challenge this week is Thinking of You.


Tim Holtz Large Stems Bigz die

I decided to make a card using Tim Holtz Bigz die - Large Stems as my focal point. However I started with the background, as I often do to ensure I get the right balance of colours. I added some Transparent texture paste in places through Tim Holtz Latticework stencil on my card and sprinkled lightly with Seth Apter Baked Texture. Once the paste was dry I heated the embossing powder. I then added Distress inks in various blues to the surface, followed by some stamping with the Lattice stamp from Tim Holtz Lattice and Flourish. 


Tim Holtz Large Stems Bigz die

I die cut my flowers and used Distress Paints in Hickory Smoke, Blueprint Sketch and Tumbled Glass to colour. I added some random stamping and splattering too! I die cut again in black to create the shadow. Mt words are from Simple Sayings (Tim Holtz).


Tim Holtz Large Stems Bigz die


Thank you so much for your visit, see you next week!
Nikki 

Friday, 7 June 2019

Tattered Butterfly Shadow Box

Tim Holtz Tattered Butterfly Shadow Box

A few weeks ago I attended a workshop at Country View Crafts with A Vintage Journey's owner Brenda Brown. Brenda is a great teacher, her projects are always so well planned with lots of techniques and always a gorgeous composition. I was inspired by this and adapted her ideas to create my Tissue Paper project for our latest challenge at A Vintage Journey.

This is Brenda's original design - and here is a link to her blog post.
By Brenda Brown
I changed mine slightly to use butterflies rather than bunnies!
Tim Holtz Tattered Butterfly Shadow Box
Nikki's version
My new version incorporates Tim Holtz Botanical Collage Paper and other images stamped onto tissue paper for my background. This version is a little smaller and instead of card I used corrugated box card for my background. I added some gesso and crackle paint before adding my tissue papers to the surface. I then painted elements of the background - the leaves and berries.
Tim Holtz Tattered Butterfly Shadow Box
My butterflies and frame used techniques from the workshop so it would be unfair to share them in detail here - but I am sure you can see crackle paint and lots of painty layers! 
Tim Holtz Tattered Butterfly Shadow Box

Tim Holtz Tattered Butterfly Shadow Box

Tissue paper is a great way to get stamped images onto a textured surface like corrugated card. The images may distort a little but on this sort of project it doesn't matter!

There is lots more Tissue Paper inspiration at A Vintage Journey today. Astrid is our host and this is what she says:
There are many different ways you can incorporate tissue paper into your project - create texture by scrunching it up, stain it, paint it, wax it, stamp on it, emboss on it. You could use cheap tissue from the supermarket, recycle gift wrapping tissue, or even use old dressmaking patterns. Just remember to create in one of our preferred styles of vintage, shabby, mixed media, art journaling, industrial, timeworn or steampunk.

So do pop over and take a peek!
Nikki
xxx

Friday, 19 April 2019

Crackled Pebbles with Faceted Heart

I recently showed the Neutrals project I created for our challenge theme this month at A Vintage Journey. (Here). Today I am sharing the 'how to do' tutorial for this!


Nikki
xxx