Hi everyone - it's time for another challenge at A Vintage Journey and our host this time, Jenny, has asked us to 'Get Some Texture'. As usual it is all about being Tim Holtz inspired - whether it's the techniques or products. It's both for me today - with the focus on the techniques he uses for creating texture.
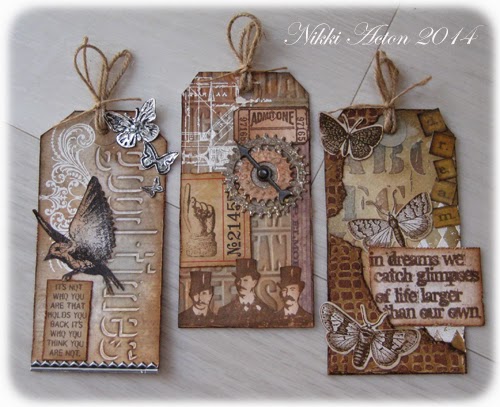
I produced a set of tags all using slightly different texture creating techniques - although I started each of them with a background stamp, embossed with white embossing powder. On the left it is a flourish, the centre a blueprint stamp and on the right the harlequins (mostly hidden now).

Tag 1:
For this tag I used one of Tim's debossing folders - I found it quite difficult to only get the ink on the area to be debossed so I used the other technique he offers us of highlighting the debossed area afterwards with distress markers. Anyone else having trouble with this? - maybe my ink pads are too juicy but I get ink on areas other that the text when using the pad!
 Also on this tag I created my textured butterflies by embossing some foil tape sheets which were then highlighted with black paint. (The butterfly embossing folder is from my stash - I then cut out the butterflies.) Some stamping, inking and an industrial border finished this one.
Tag 2:
My second tag used embossing paste through Tims cargo layering stencil which I then highlighted with various inks. I also added part of a failed tag - paste through the burlap layering stencil which I tore pieces off and added to this tag to create additional texture. Salvage stickers and the sentiment were then added. I like this one the best!
Tag 3:
The final tag used a texture fade - sorry can't remember what it is called. Distress inks were added to highlight the embossed areas.I also added some cogs from my stash on this one. I often add embossing powder to my cogs (eg ranger antiquities) to create texture which I then ink over or use gilding wax.
I added a game spinner and some stamped images on this one too. As the stamped images were to be placed over textured surfaces they were cut out first of course - adding increased dimension.
So texture fades, embossing powder, layering stencils, debossing folders and foil tape sheets - lots of Tim texture! There were actually five made - so I may share the others later.
Don't forget to visit A Vintage Journey to see the amazing creations of the other Creative Guides.
Thanks for looking.
Nikki
xxx


