Showing posts with label Canvass. Show all posts

Monday, 30 March 2020

Isolation Skype Craft 1


Hello everyone

What difficult times we are living through. I feel lucky to have a hobby to turn to where I can sometimes forget any problem or worries.

On Friday I got together (virtually of course) with two crafting friends - Brenda Brown and Alison Bomber for one of our 'Skype Craft' days - it's been a while since we have done this. What a joy to spend several hours crafting, chatting and laughing with friends.

I worked on a large canvas, Brenda on a similar sized board and Alison in her large journal. 
As we have done in the past we take it turns to select the next step. I took photos at first then got carried away and stopped!!!

1. All - Seal the substrate with a coat of gesso/tinting base.

2. Alison - Use tissue paper and/or tissue tape.

3. Nikki - Use a stencil for some texture.

4. Brenda - Add some text/number stamping in any gaps

5. Alison - Add more than one colour paint in any way you'd like to,

Here you can see my strips of tissue paper, Grunge Paste through a brickwork stencil, some stamping and some washes of colour (Paper Artsy paint) added and then dabbed to remove with kitchen towel.

6. Nikki - Use something to create a resist. 


I really wanted use my new Izink Ice Translucent Gels from Seth Apter - so scraped some over the surface and dried. I also added some candle wax in places for additional resist.

7. Brenda - Use a colour medium to reveal your resist areas.

I added lots more paint layers at this point to create more contrast and depth and also allowed some paint to drip. 

8. Alison - Add some more stamping but not text and numbers.

I used a wonderful leaf stamp - from Lin Brown - PaperArtsy. 


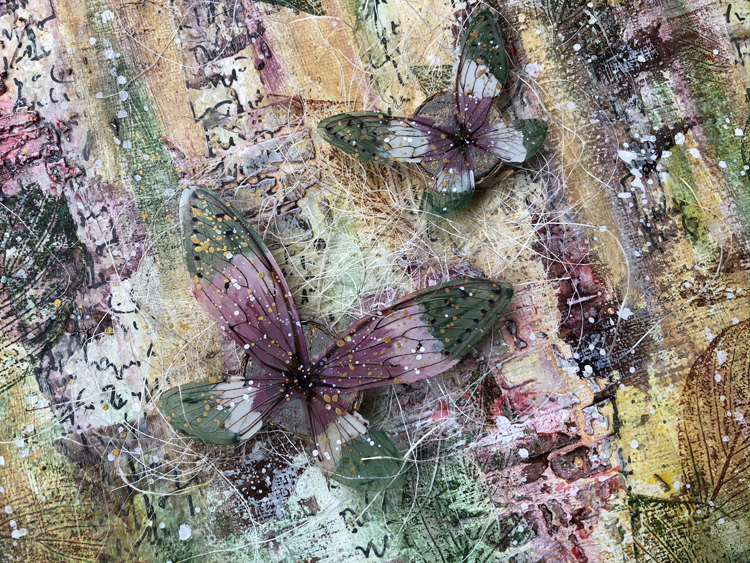
9. Nikki - Select a focal point and gather elements together.

Textured Canvas with PaperArtsy Fresco Paint, Seth Apter Izink Ice, Tim Holtz Transparent wings

 10. Brenda - Alter/colour up/prepare and position elements for your focal point/s.

I painted the back of the Tim Holtz Ideology transparent wings in colours to match my canvas and splattered the front with white and gold paint. 

11. Alison - highlight or refresh the original background before adhering the embellishments.

I continued to build up my layers adding some dry brushed paint and using my pallet knife to add more Izink Ice. Oh and some splattered paint of course. The brown I originally scraped for resist, the red in the bricks and the transparent yellows on the canvas is the ICE.

Textured Canvas with PaperArtsy Fresco Paint, Seth Apter Izink Ice, Tim Holtz Transparent wings


I love some of the textures I managed to create - not sure about the overall composition but love the texture !!!!
When we do these sessions it is amazing how different everyone's turns out. Here are some sneak peaks for Alison and Brenda.


Sorry for this long post! We are hoping to Skype Craft again very soon - so look out for our next adventure!

Take care, stay safe, stay home (if you can) 
Nikki xxx


Sunday, 26 May 2019

Friday, 24 August 2018

Baked Texture Abstract

Abstract with PaperArtsy Fresco Acrylics, Everything Art stamps and Seth Apter Baked Texture Embossing Powder

Today you can find me over at PaperArtsy with this abstract canvas using Seth Apter's Baked Textures and PaperArtsy stamps and paints.

Nikki
xxx

Friday, 6 July 2018

Inspirational quotes canvas for A Vintage Journey

Canvas with Dina Wakley paints and Tim Holtz stamp sets - Perspective and Theories
Hi all. Today I am hosting the new challenge at A Vintage Journey. The theme this month is Get Sentimental. Time to use those words - be they poems, quotes or other sentiments.

My project is a 10x8 inch box canvas which I added texture to with paper/card scraps and texture paste before adding lots of wonderful colour with Dina Wakely paints. I am not going to go into lots of details on the process as I am back at AVJ in 2 weeks with a tutorial where I will be detailing the same process but on a much smaller scale!

Canvas with Dina Wakley paints and Tim Holtz stamp sets - Perspective and Theories

All my background words are from Tim Holtz Theories stamp set - stamped onto tissue paper before adding to the canvas. 

Canvas with Dina Wakley paints and Tim Holtz stamp sets - Perspective and Theories

Tim Holtz Butterfly Duo is always a go to item for me! Painted with the same paints and used an oil pastel over the embossed areas for contrast.

Canvas with Dina Wakley paints and Tim Holtz stamp sets - Perspective and Theories

Another favourite for my main Sentiment! Tim Holtz Perspective stamp set - embossed with ink and white powder over a painty background scrap.

If you haven't already come from there - do head over to A Vintage Journey for lots more inspiration!

I would like to play along at:

Nikki
xxx

Friday, 2 February 2018

Embossed canvas

Embossed layers canvas by Nikki Acton
Hello everyone! A new challenge starts today at A Vintage Journey and we are 'Melting It'!
Julia is out host and says...
Get out the UTEE (ultra thick embossing enamel), beeswax, encaustic wax, embossing powders or good old wax crayons and a heat tool and get melting to create something in a vintage; shabby; mixed media; art journalling; industrial, timeworn or steampunk style!

I took this 4 inch (previously used) canvas and applied some Grunge Paste to cover the previous contents and also to provide some texture. I applied various Dina Wakley paints to make my background and then added versamark and embossed with clear powder.
I repeated this and while the second layer was still warm sprinkled some purple and sparkly red embossing powder too. I didn't realise my purple wasn't really purple but went with it and continued adding embossed layers until I was happy with the result!
The edges and base star are embossed with Frantage (Aged Black).
Embossed layers canvas by Nikki Acton
Never easy to capture these effects on camera but hopefully you can some of the layers here!
Nikki
xxx

Friday, 7 July 2017

All Square

Canvas with Dina Wakely Paints by Nikki Acton
Today sees the start of new challenge at A Vintage Journey hosted by Tracy. The theme for the next 4 weeks is All Squared Up.....

Whether a frame, embellishment, die cuts, drawn squares, doodles or windows, let's see where inspiration takes you, let's get all squared up and show how creative those right angles can look! Show us your squared up pieces in a vintage; shabby; mixed media; art journalling; industrial, timeworn or steampunk style.

I really went all out squares on this one! The canvas is quite large for me - 12 x 12 inches. I have used all Dina Wakely heavy body acrylics with the exception of the browny / grey colour. I started with a blend of greens / blues and yellows but think most is covered now as I began sponging through homemade square stencils using different colours and sizes. The stencils were just made with photocopy paper.
Originally I planned to add more than just the stencilled squares but I liked it - so left it! Actually it was hard to stop as each time I added another size / colour I always felt it needed another layer. 

Lots more inpspiration today at A Vintage Journey so do hop over and join in for your chance to win our sponsors prize or to be a Pinworthy this month.

Nikki
xxx

Friday, 2 June 2017

Canvas on canvas

Heart and Soul Mixed Media Canvas - by Nikki Acton
 Hello! We have a new challenge commencing today at A Vintage Journey - where the theme is Canvas. It doesn't matter how as long as some canvas is a dominant feature of your project. Perhaps you may use a canvas in the traditional way or use the reverse to create a shadow box? Canvas boards are fabulous to work on or perhaps you have some canvas sheets which can be cut and adhered to another surface.

A couple of influences here - firstly this image I found on Pinterest. I love the textured surface and wonderfully embellished heart. 
Click here for link
Secondly I recently attended a France Papillon workshop where we made these:
I started off with a previously used canvas which had die cuts adhered so I decided the best way to cover it was with lot's of texture. I painted it black before adding a mixture of texture paste, crackle paste and sand paste. While still wet I scraped vertical lines into the surface. 
Once dry I added washes of Prussian Blue and Burnt Umber paints - blending a little in the middle.
I then decided to add some Golden Bead Gel - followed my a little more paint.
I cut a piece of canvas and coloured it with a watery wash of Transparent Red Iron Oxide. The next layer is from the France Papillon workshop - adding some crackle paste and painting once dry. My heart was cut by hand from watercolour card, painted and given firstly a coat of transparent texture paste and then a little bead gel.
For more inspiration do pay a visit to A Vintage Journey to see what my fellow Creative Guides have come up with! 
Have a great weekend.

Challenges entered:
Country View Crafts - Hearts

Nikki
xxx

Tuesday, 30 May 2017

Loop de Loop playtime

Canvas with Seth Apter Loop de Loop die - by Nikki Acton
Hi everyone. I really have not been a good blogger recently, posting only my projects for A Vintage Journey and That's Crafty. So today time for a post for my blog! 

This is a 12 x 9 inch canvas I made a couple of weeks ago - just for fun. Truth is I can't quite remember what I did - but I will try my best.

I started with a coat of gesso and once dry added random circle stamping with Seth Apter / Spellbinders Turnaround stamp set and archival ink. I added watering washes of Seth Apter PaperArtsy limited edition paints - green patina, mahogany and and terracotta. 
Canvas with Seth Apter Loop de Loop die - by Nikki Acton
I added some clear texture paste randomly through a stencil and Deco Art Sand paste around the edges. I allowed this to dry before adding additional colour and allowing it to drip over the surface.

I die cut the letters and Loop de Loop die (several times to adhere together for dimension) and stippled with black gesso. This creates a wonderful subtle texture - perfect for sponging paint over for a rusty / grungy effect. I sponged with the same colours as the canvas to create a worn / rusty feel. More mahogany on the outer circle, more black inside, green patina to highlight.
Canvas with Seth Apter Loop de Loop die - by Nikki Acton
That's all for now - back later in the week with a project for That's Crafty and then a new challenge on Friday for A Vintage Journey.

I would like to enter Loop de Loop into this weeks Simon Says Stamp Monday Challenge - Going Round in Circles.

Nikki
xxx


Friday, 3 March 2017

Celebrating with Tim Holtz Mini Detailed Butterflies

Mixed Media Canvas with Tim Holtz Mini Detailed Butterfly Thinlits - by Nikki Acton
Today we celebrate our third birthday at our Mixed Media challenge blog - A Vintage Journey! Our challenge for this month is All Aboard - an anything goes theme as long as your creation fits one of these genres - vintage; shabby; mixed-media; art journaling; industrial, timeworn or steampunk.

For my design this month I have created a 5x7inch canvas featuring the new Mini Detailed Thinlits from Tim Holtz, That's Crafty ATC's,  PaperArtsy Fresco Finish Paints and Stamps by Lin Brown.

I started with the canvas - building up colour and layers. I then took 3 That's Crafty MDF ATC's - well they are actually framed ATC's and I have just used the central portion. I added Deco Art Crackle paint and allowed to dry. I then added watery paint over the surface and once dry added a little antiquing cream.  I stamped over these ATC's with Lin Brown's grasses stamp from her recent Eclectica / PaperArtsy release.
While painting the canvas I used the same colours on some card which I used to cut the base of the butterflies. The top layer was cut from black card and a little paint sponged over.

My words are also from Lin Brown's stamp sets. The little greyboard panels were cut from Tim Holtz Mosaic die.
Mixed Media Canvas with Tim Holtz Mini Detailed Butterfly Thinlits - by Nikki Acton
Nikki
xxx

Friday, 9 December 2016

Totally inspired by Tracy Scott! Flower Power

When I say inspired by, I virtually mean copied! I did a great art journalling workshop with Tracy Scott recently and I decided to use her journal layout on a canvas. You can see her original piece on Facebook (21st October) @myjournallingjourney. Do visit her blog too...here.
Tracy Scott - Journal Page

We have a new challenge today at That's Crafty! and as the theme is Flower Power I thought this was perfect! As always there is a £20 voucher to spend at That's Crafty! for the winner!

I decided to add a border on my canvas version so used torn paper to create a mask around the edge... I added some subtle stamping to this border area.
The focal flowers are handpainted over a gesso and stenciled background and lots of doodling added! Got to say I need to work on this to match Tracy's drawing.
I used an Andy Skinner stencil in the background and Deco Art Media Fluid Acrylics to paint.

Nikki
xxx

Friday, 25 November 2016

All Grungy at That's Crafty!

Time for a new challenge at That's Crafty! - and we are getting grungy. 
I have used a reverse canvas and began with some scraps on my desk - some hessian stars that were falling apart and some string - both secured to the canvas to create texture. Once dry I coated it all in black gesso. Dry brushing with white gesso highlighted the textured areas allowing me to emphasise with some blues and browns.

To build up the layers I took some corrugated cardboard and painted it before adding some mesh. Some painted coffee stirrers created the border. My heart came off a recycled project and I wrapped it in various yarns and strings.
My letters were computer printed, mounted for a bit more thickness and highlighted in blue before adding a little paint around the outside.

Nikki 
xxx

Monday, 3 October 2016

Bright and Scary? Guest design for Simon Says Stamp

Halloween Andy Skinner Day of the Dead
Hello! I am very honoured to be guest designer at the Simon Says Stamp Monday Challenge for the month of October! Today is my first creation with the theme of Halloween.


I decided to use Andy Skinner's 'Day of the Dead' stencil on my canvas with Dylusion's paints in Postbox Red and Lemon Zest. I began with a mix of the two to create an orange base coat. I then took my stencil and used Black soot distress paint. I also stencilled the skull onto white card and cut it out to create a mask.
Using the mask to cover the skulls I applied Postbox Red through Tim Holtz layering stencil (Shattered) to create cobwebs around the skulls.
Once dry I added a little Lemon Zest around the edges to create a halo effect. 
Finally I dripped red paint onto the edges of the canvas and drew and painted a couple of bats in the corners.
A big thanks to Lols for the invitation to join the Simon Says Stamp team this month - I will be back with my second creation next week.
Nikki
xxx


Monday, 25 July 2016

Love abstract art!

Our current challenge theme at Country View Crafts is all about circles so I decided to create an abstract painting. This canvas is 8inches x 8inches and is one of my previously used ones - creating lots of additional texture underneath.
I started with a coat of white paints to cover the previous work and then lots of texture paste through varying stencils.
I then got my paints out - distress paints - the bright ones -and just worked in random (ish) blocks - blending the edges. I then added some black paint with a credit card.
Whoops got carried away here and stopped taking photos. I replaced some of the stencils and highlighted some of my circles with paint. I added some additional circles with a swirly stamp and a cork. 
Finally I added a little treasure gold in places. In a moment of madness I decided to coat in a metallic glaze - which has really subdued the original colour intensity - not my wisest decision, it was better before!

Linking up with Simon Says Stamp - Monday - Add some texture
Thanks for stopping by!
Nikki
xxx