Showing posts with label A Vintage Journey. Show all posts

Friday, 4 December 2020

Getting Merry and saying goodbye!


Hi everyone - it has been some time - I have turned into a reluctant blogger! Today sees our final challenge at A Vintage Journey.  I know, very sad - but the craft world seems to be moving away from blogging into the instant social media world! For me, I hope this changes - I find most (not all!) of social media quite toxic and find I am using it less and less. I feel it creates more harm than good - but that's just me! 

For our final challenge we have created on the theme of Merry Little Christmas - ATC's to celebrate this wonderful time of year. I created some inky backgrounds with Distress inks / oxides and added some background stamping. The stamps are a combination of Sara Naumann (PaperArtsy) and Tim Holtz.


I have combined stamping on some painty backgrounds with stamping and fussy cutting on book paper.


Can't beat a few splatters to finish off! The designs originate from a recent Tracy Evans workshop I did. Tracy was one of the original AVJ DT! 

Our final make is another ATC to say goodbye!
This time a gelli print background with a fussy cut bird from Tracy Evans (AALL and CREATE).


The words say it all - I cherish my 6.5 years with AVJ -  a wonderful experience and some fabulous friendships made! But we must focus on today - even in Covid times - and adapt as we can to what is 'in the now'.

Love and hugs to everyone at AVJ, past and present, and the wonderful followers of our blog.
Nikki
xxxx

Friday, 2 October 2020

A little numerical journalling


It seems ages since I have I have joined in one of the challenges at A Vintage Journey. This month the theme is Numbers - hosted by lovely Annie!

"Numbers is our challenge theme for this month and we would like to see them being a focal point in your entries. You can use stencils, die cuts, fussy cuts or rub ons, rust them up, use texture paste or paint them, the decision is yours as long as the numbers are prominent. Just remember to create your project in one of our preferred styles: vintage, shabby, mixed media, art journaling, industrial, timeworn or steampunk."

I decided to a create journal page with lots of numbers. My background was fun - a combination of collage, stamping, stencils, washi, paint etc. 
I die cut some flowers in black card and added numbers to these too before dry brushing over the surface as the black was a bit - black! I wanted the quote and clock to have a little more prominence!

I don't know why but I have really lost my mojo during the pandemic - when it would be a great opportunity to craft. This was a fun way to just be free and play.

Nikki

Friday, 29 May 2020

Tag Friday - it's a bright one!

We have a Tag Friday at A Vintage Journey today.  I am still in my bright colour phase, following a couple of Dina Wakley online classes!
This time though I have used the new face stamp from PaperArtsy / France Papillon. I had great fun using these for a recent post for PaperArtsy - and Lilly (as FP calls her) was still on my desk.

The Dina influence is evident - but great mix and change styles!
The face is stamped on tissue paper, coloured on the reverse before adhering to the loosely painted background on the tag.

I hope everyone is keeping well during these difficult times. As some know I am struggling with the isolation of living alone, working at home and the gym shut. But art remains a great outlet for my frustrations.
Nikki xxx


Friday, 3 April 2020

Journalling with Gelli Plate Prints

Journal Page using Gelli prints

Hi everyone - time for our April challenge at A Vintage Journey hosted by the lovely Julia Aston of Create with Me.

It's Gelli Time!

Yes, get those gel plates out and have a play.  Printing and mark making are unique and somewhat addictive when you start so let us see what you create and how you use it in your project.  Just remember to create your project in one of our preferred styles: vintage, shabby, mixed media, art journaling, industrial, timeworn or steampunk.

I love using my Gelli Plate and it's a bit of a go to - when my mojo is lacking! I love to experiment with textures and layers and just seeing what happens. No two prints are ever the same and that is its magic! 

I therefore have alot of prints lying around and decided to see what would happen if I punched some circles and created a montage.


Journal Page using Gelli prints

I punched 2.5, 2, 1.5 and 1inch circles of 5 prints and arranged them on my page - this was a challenge! Once happy I stuck them down and then adding a little extra stamping, doodling and stencilling - including a little on the black background.


Journal Page using Gelli prints

I am sure the girls at AVJ have some great ideas - so do hop over for some inspiration. We would love it if you joined in the challenge.


Stay safe everyone.

Nikki xxxx


Friday, 6 March 2020

Celebrating our Anniversary at A Vintage Journey

Mixed Media Birthday Card with Tim Holtz Tattered Butterfly die

Hi everyone. A Vintage Journey is celebrating it's 6th Anniversary! I know blogs and challenge blogs have lost some of their popularity but this one is very dear to me. I have made good friends, many of who I have met because of this blog. I have also been inspired by many artists both from the Design Team and those who have entered our challenges.

Brenda who created and started this blog is our host this month. We are looking for Celebration themed creations - let us know what you are celebrating!

My card is for one of those crafty friends who celebrate their birthday this month.

My background is some printed paper which I added some washes on paint to to tone it down a little. I painted and crackled some corrugated card as the base for my Tattered Butterfly.


The butterfly was cut from greyboard and texture paste added which I randomly stamped into to create texture. Once dry I painted black, dry brushed with white and then added washes on paint.

Under the butterfly are some weird extra wings. These are actually part of a wildflower die that I altered and really wanted to use but it didnt work with my layout so I improvised. 


A few crackled arrows, some fibres....


and some little squares complete my card. I hope you like it!


We hope you will join us for our celebratory challenge. 
Nikki 
xxxxx

Friday, 3 January 2020

Eileen Hull Notebook for AVJ

Eileen Hull Notebook Die
Happy New Year!

We begin 2020 with the theme 'We are all getting older'! at A Vintage Journey. Well that is true !

Time for weathering and distressing, or some ageing and antiqueing. Make a project using techniques for making the new look old, whether that's paper projects, altered art or mixed media. Just remember to ensure that you create in one of our preferred styles of vintage, shabby,mixed media, art journaling, industrial, timeworn or steampunk.

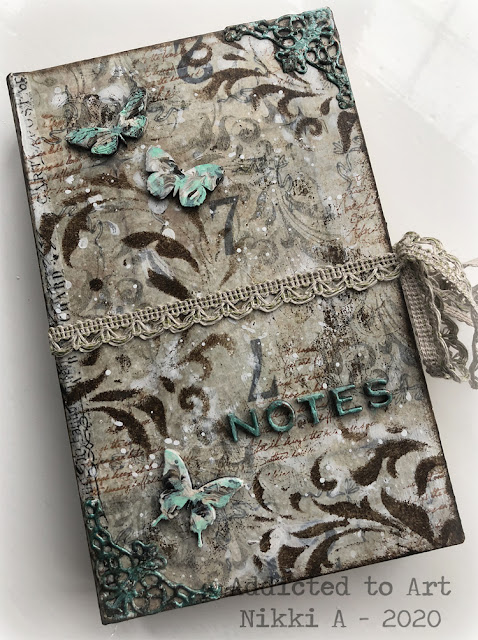
I have created a vintage notebook using Eileen Hull's notebook die. I began with the die cut book and covered in some Tim Holtz paper and added washi tape to help reinforce the spine. I started with washes of gesso to tone down the paper before stencilling, stamping and splattering to finish the cover.
I used distress paints to alter the little butterflies, corner pieces and letters.
The inside was simply done with a little paint and stamping before the signature was secured with some outer pages.
I cheated a little with my pages - using a stapler to create the signatures - which I then secured together with some calico down the spine.
Eileen Hull Notebook Die

Eileen Hull Notebook Die
Do head on over to A Vintage Journey where the lovely and talented Alison Bomber is our host for this challenge. There is lots of ideas to get you inspired if you would like to join the challenge.
Nikki


Friday, 22 November 2019

Vintage Easel Card with Tim Holtz products

Vintage style Easel Card with Tim Holtz
Three posts in a week for me! Haven't done that in a long time. Over at A Vintage Journey I am sharing a tutorial on this Vintage style Easel card today.... lots more details and photos here!
Nikki
xxx

Friday, 6 September 2019

Gelli Printed Techniques Box

Gel plate printed box
Today sees a new challenge at A Vintage Journey - 'Box it Up. Julia is our host this month and describes the challenge:

This month our theme is boxes! Perhaps you will make a trunk or suitcase, some kind of package to hold a gift, or maybe make a card or journal page showing presents. Just remember to ensure that you create in one of our preferred styles of vintage, shabby, mixed media, art journaling, industrial, timeworn or steampunk.


I have been playing with my gel plates and monoprinting recently so decided to make a box for different techniques and ideas. The box is designed to fit ATC's so I can store my ideas or samples ATC size.


Box Dimensions
As ATC's are 2.5 x 3.5 inches my box was designed at 3.75 wide, 2.75 high and 2.5 deep.
So for the base my card measured 9.25 x 8 inches. I scored on the long side at 2.75 and 6.5 and on the shorter side at 2.75 and 5.25.
I make my lids 1/8 of an inch bigger.
So my card was 6 and 3/8 x 5 and 1/8. Scoring on the long side at 1.25 (1 and 2/8) and 5 and 1/8 and on the short side at 1.25 and 3 and 7/8.

I painted one side of each cut piece of card and added a little stencilling and stamping - these become the inside of the box. I sealed with matt medium as I was going to turn them over and make a mess so wanted to be able to wipe if any stray paint found itself onto the surface.

Next I worked on the card that would be the outside of the box.
I used a small gel plate, added a colour with a brayer (PaperArtsy Fresco Acrylic paint) and then added a pattern with either a stamp or stencil. I then stamped the gel plate onto the card in patches in different places. I repeated this many times with different colours - sometime working over a previously coloured area. I added a little sponged paint through a stencil (circles) to bring the varied patterns together a little bit.
The finished box with a few ATC samples!
Gel plate printed box
I hope you like my little box! Lots more box like inspiration at A Vintage Journey today - be good to see you there.

Nikki

Friday, 30 August 2019

Dream It - Create It -Tag Friday at A Vintage Journey

Hi everyone! My blog has been quite neglected of late but back today with a project for our Tag Friday post at A Vintage Journey.
I have been struggling with both time and motivation to create recently - which saddens me! Hopefully as the colder months arrive I will find more time and a little creativity.
I started with the background, Seth Apter style - building a few layers - dark then light without worrying too much about what went where as long as some of each layer was showing through. I then took some watercolour card and monoprinted additional layers of colour - this gives the slightly mottled appearance. A little stamping and stencilled circles to finish. All paints were Paper Artsy Chalk paints.
I created a few layers with die cut frames, and some altered patterned paper along with the altered clock face and clock hand - all using Distress paints.
I have no idea where the word stamp came from, but I found it my folder of random stamps and its seemed appropriate for my lacking mojo! I added some camera film and altered some strips of cotton material to finish.
I am sure there will lots of wonderful creations on the Tag Friday post at A Vintage Journey so do head over! 
Thanks for stopping by.
Nikki

Friday, 7 June 2019

Tattered Butterfly Shadow Box

Tim Holtz Tattered Butterfly Shadow Box

A few weeks ago I attended a workshop at Country View Crafts with A Vintage Journey's owner Brenda Brown. Brenda is a great teacher, her projects are always so well planned with lots of techniques and always a gorgeous composition. I was inspired by this and adapted her ideas to create my Tissue Paper project for our latest challenge at A Vintage Journey.

This is Brenda's original design - and here is a link to her blog post.
By Brenda Brown
I changed mine slightly to use butterflies rather than bunnies!
Tim Holtz Tattered Butterfly Shadow Box
Nikki's version
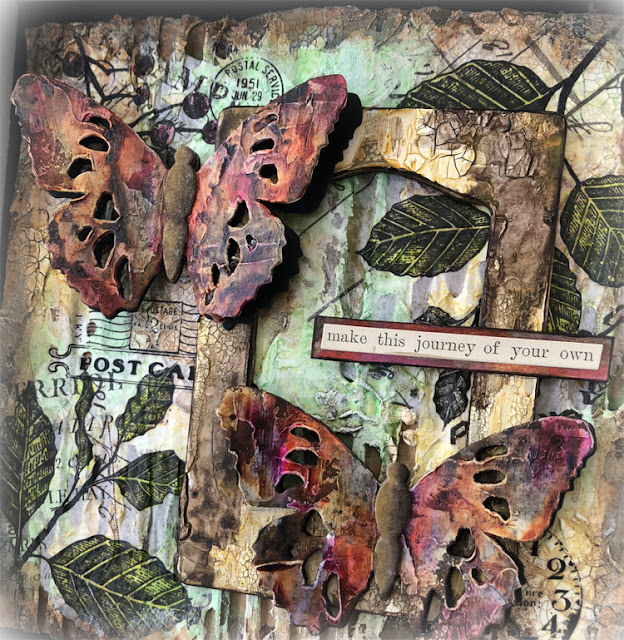
My new version incorporates Tim Holtz Botanical Collage Paper and other images stamped onto tissue paper for my background. This version is a little smaller and instead of card I used corrugated box card for my background. I added some gesso and crackle paint before adding my tissue papers to the surface. I then painted elements of the background - the leaves and berries.
Tim Holtz Tattered Butterfly Shadow Box
My butterflies and frame used techniques from the workshop so it would be unfair to share them in detail here - but I am sure you can see crackle paint and lots of painty layers! 
Tim Holtz Tattered Butterfly Shadow Box

Tim Holtz Tattered Butterfly Shadow Box

Tissue paper is a great way to get stamped images onto a textured surface like corrugated card. The images may distort a little but on this sort of project it doesn't matter!

There is lots more Tissue Paper inspiration at A Vintage Journey today. Astrid is our host and this is what she says:
There are many different ways you can incorporate tissue paper into your project - create texture by scrunching it up, stain it, paint it, wax it, stamp on it, emboss on it. You could use cheap tissue from the supermarket, recycle gift wrapping tissue, or even use old dressmaking patterns. Just remember to create in one of our preferred styles of vintage, shabby, mixed media, art journaling, industrial, timeworn or steampunk.

So do pop over and take a peek!
Nikki
xxx

Friday, 19 April 2019

Crackled Pebbles with Faceted Heart

I recently showed the Neutrals project I created for our challenge theme this month at A Vintage Journey. (Here). Today I am sharing the 'how to do' tutorial for this!


Nikki
xxx
Friday, 5 April 2019

Keeping it neutral

Textured Wall Art with Tim Holtz / Sizzix Faceted Heart die
Hi everyone. This month at A Vintage Journey our challenge is Neutral Zone. Time to banish colour and create with blacks, whites, greys, beiges, creams and browns only. I have made this 8x8 inch panel with greyboard coasters altered to create stone effects. I seem to be using the Faceted Heart alot at the moment - here it is again!

I will be sharing a tutorial post on how I created all the textured effects at AVJ in a couple of weeks - so for now its just some photos. I loved making this so much I repeated it but this time with a little colour!
Textured Wall Art with Tim Holtz / Sizzix Faceted Heart die

Textured Wall Art with Tim Holtz / Sizzix Faceted Heart die

Till next time!
Nikki

Friday, 29 March 2019

Texture Tag for AVJ

Tim Holtz Faceted Heart and new Wildflowers - Tag Friday
Hi everyone.  Today it is one our Tag Friday features at A Vintage Journey.
I have used an MDF tag, allowing me to add lots of texture and paint to the surface. Texture paste was added to the surface through a stencil and texture sand paste around the edges before I painted and highlighted with distress crayons.

A simple design was added with a small rusted Faceted Heart and some of Tim Holtz new Wildflowers.
Tim Holtz Faceted Heart and new Wildflowers - Tag Friday

Tim Holtz Faceted Heart and new Wildflowers - Tag Friday
Both the heart and flower had a little clear crackle added too.

If you havent come from there so pay a visit to A Vintage Journey for some more Tag shaped inspiration!
Nikki
xxx