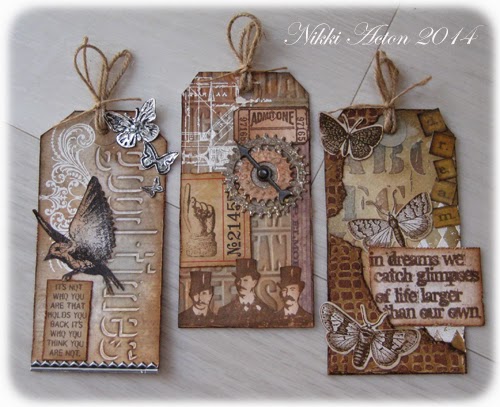
Hi everyone - it's time for another challenge at A Vintage Journey and our host this time, Jenny, has asked us to 'Get Some Texture'. As usual it is all about being Tim Holtz inspired - whether it's the techniques or products. It's both for me today - with the focus on the techniques he uses for creating texture.
I produced a set of tags all using slightly different texture creating techniques - although I started each of them with a background stamp, embossed with white embossing powder. On the left it is a flourish, the centre a blueprint stamp and on the right the harlequins (mostly hidden now).

Tag 1:
For this tag I used one of Tim's debossing folders - I found it quite difficult to only get the ink on the area to be debossed so I used the other technique he offers us of highlighting the debossed area afterwards with distress markers. Anyone else having trouble with this? - maybe my ink pads are too juicy but I get ink on areas other that the text when using the pad!
 Also on this tag I created my textured butterflies by embossing some foil tape sheets which were then highlighted with black paint. (The butterfly embossing folder is from my stash - I then cut out the butterflies.) Some stamping, inking and an industrial border finished this one.
Tag 2:
My second tag used embossing paste through Tims cargo layering stencil which I then highlighted with various inks. I also added part of a failed tag - paste through the burlap layering stencil which I tore pieces off and added to this tag to create additional texture. Salvage stickers and the sentiment were then added. I like this one the best!
Tag 3:
The final tag used a texture fade - sorry can't remember what it is called. Distress inks were added to highlight the embossed areas.I also added some cogs from my stash on this one. I often add embossing powder to my cogs (eg ranger antiquities) to create texture which I then ink over or use gilding wax.
I added a game spinner and some stamped images on this one too. As the stamped images were to be placed over textured surfaces they were cut out first of course - adding increased dimension.
So texture fades, embossing powder, layering stencils, debossing folders and foil tape sheets - lots of Tim texture! There were actually five made - so I may share the others later.
Don't forget to visit A Vintage Journey to see the amazing creations of the other Creative Guides.
Thanks for looking.
Nikki
xxx


Beautiful tags Nikki! love the browns, the embossings, and all the 'pieces' layered on! Wonderful textures on all three!
ReplyDeleteAbsolute stunning tags Nikki! Very vintage with heaps of texture. Nothing could be better. Karen.x
ReplyDeleteOh Nikki you've outdone yourself here. Love the way you've kept a neutral colour scheme and let those textures really shine through. Superb! Jenny x
ReplyDeleteWhat a stunning trio Nikki, each one is gorgeous in its own right! Fab imagery, fab composition too. A job well done! Chris xxx
ReplyDeleteWhat can be better than texture? Well, texture times three! Nikki, your three tags are stunning! Love them all. Anne xx
ReplyDeleteAbsolutely fabulous set of tags Nikki!! Love those great grungy colours and the texture techniques you have used look stunning! What a wonderful set, love it to bits!!
ReplyDeleteAbsolutely beautiful, Nikki - I love the limited colour palette and gorgeous techniques on display on each tag... love, love, love (that's one for each of them!).
ReplyDeleteAlison xx
These are GORGEOUS! I love all of the texture and eye candy on these. So much to see and it all works beautifully together.
ReplyDeleteWhat a great tags, a real pleasure to look at!
ReplyDeleteKind regards, Alie :-)
Hi Nikki, just beautiful tags, love the way you have coordinated them. I am inspired to have a go. Thanks x
ReplyDeleteAll 3 absolutely gorgeous tags in their own right, love the colour and addition of white lifts them to another level, really like these!
ReplyDeleteYou have spoilt us here Nikki with not one but three fantastic tags. Love the metal butterflies and the little burlap bits you have used from your failed?? tag. I had problems with getting the ink inside the deboss also, not the easiest technique to master, but highlighting the debossed areas works well on your tag as does the cargo stencil texturing, really nice. Mo x
ReplyDeleteFabulous tags and textures. Great techniques as well.
ReplyDeleteYvonne
Beautiful tags! You've used this palette of neutral colors so wonderfully! I like all three in the same way, they are wonderful! BArbarayaya
ReplyDeleteGorgeous tags love the colours
ReplyDeleteBecky x
hi Nikki your trio of tags are absolutely stunning, with amazing techniques, texture and details.
ReplyDeletei have the debossed folders but have yet to use them. thank you so much for sharing the tutorial
crafty hugs
annie x
Nikki - just fabulous and to think you managed three GREAT tags for one challenge - I'm in awe!!!
ReplyDeleteWow, love these tags Nikki, they all demonstrate how textures can be used in subtle ways to create such depth and dimension to any project. TFS xxxx
ReplyDeleteI especially like that "pressed in" word on the left hand tag, love how you have done that very awesome.xx
ReplyDeleteFabulous grouping of vintage tags, Nikki. Love all the texture and techniques you combined on the magnificent three! Enjoy the weekend!
ReplyDelete